Sunday, June 24, 2012

Isabel's scarf

Yesterday I warped up the Orlon for Isabel's scarf for the first trial of the Nilus Leclerc Dorothy table loom.  The colours are pink/fuscia combinations and it will be a basic twill in a crammed and spaced warp (the first time I have tried this).
Warped and tied off
 Note the calculations in the book under the warp - needed to work out the spacing to take the warp from twice as much (as the calculated sett) to 0 and back.  More about this later...
Chained

The Loom all ready to go

The only raddle I have (for the Macomber), and just a tad wider than needed!

That's the whole warp stretched out (enough for 3 scarves)

And finally wound on and through the lease sticks
I had a close call after working out the spacings carefully for a 10 dent reed, only to find out that the reed I had carefully cleaned and set up for this project was in fact a 9 dent reed.
Recalculated spacings
I won't know if I have it right until I get weaving on this one...

TT II

During a brief lull in the spinning last night (doing catch up CF for the RSotBR project), I had another go at the Tennessee Tweed yarn - spinning three very thin singles and then plying it back on itself to get the 3 ply I will be using.  This time I did incorporate a tiny bit of colour - in this case yellow.

The resultant 3-ply works out to around 28 wraps per inch and is VERY strong, which would be a characteristic of the Lincoln long staple.

The small sample of Tennessee Tweed

Thursday, June 21, 2012

Great sliver

Anne has been weaving steadily on the RSotB Rug and is nearing completion of the first one (of a pair).  A continuous supply of roving/sliver is necessary and she has become very adept at producing it.  From my reading sliver is similar to roving but without a slight twist - I have found no definition is absolute. Regardless, with some fineness a batt can be stretched out to produce just the right thickness of sliver that can then be wound onto the ski shuttle ready for weaving.  My sliver is a little more rushed (all I have ever needed for spinning - in my defence), and needs more work when actually doing the weaving as the idea is to get 4 weft shots that are reasonably 'even.'

Perfect sliver

3rd Thursday

As mentioned in a previous blog - several of us at the third Thursday spinners group decided to try out some 'long draw' spinning.  Everyone came prepared to work on some aspect of it.  Making rolags, spinning on a charkha, a takli, normal spinning wheels and drop spindles, we all managed to try out some new aspects of long draw.  Everyone was successful, and in my case by the end of three (pre-made) rolags I was starting to get the feel of it.

I had started off prior to the meeting by giving the spinning wheel a good clean/lubricate - something I should be doing more of, but this was a good break - I removed all the bobbins and put new leaders on them, and then I rubbed some lemon oil into all the wood, and then greased all the bearings.  It's looking and working fine.

I used the three rolags spun in singles onto three bobbins.  The plying took care of most of the inconsistencies and the resultant 3-ply yarn has quite an elasticity that I certainly don't see in my 2 or 3 ply worsted/semi-worsted.  I will have to get some more practice at making the rolags as these ones were not consistent and had quite a bit of 'fluff' in them.  If I can make better rolags and do more long draw spinning I should be able to introduce a 'woolen' to the inventory.  My understanding is for warmer/loftier knitting, woolen is the choice.

A 24 yard skein of 3-ply woolen yarn

Sunday, June 17, 2012

Spinning Woolen

A couple of us at the Third Thursday Spinning group were discussing the different spinning techniques and we agreed that of all the methods the one we were most familiar with was the long backward draw - used when spinning woolen (vice worsted or some hybrid).

I said I'd prepare some rolags and bring them to the next meeting and we can have a go and perhaps pick up some tips from the more experienced (in this mode) spinners.  That led to problem number one - I'm not very good at hand carding - all the CF we have prepared has either been through the drum carder or combed.  So today I broke out the hand cards and gave it a go.
Ashford hand carders and a number of rolags
I have an Ashford book on carding (it came with the drum carder) which also shows how to card with the hand carders - I've tried before and get all confused about left and right hands, top and bottom of carder etc, so today I jumped on the Internet and found some fairly straight forward instruction videos on the subject.  As it turns out the three I watched were all quite different, but in the end with some logic applied I got into the swing of it and managed to start producing workable (I think) rolags.  We'll find out at the next meeting!!


Tennessee Tweed

I had a turn on the drum carder this morning.  When we were at the Maryland Sheep and Wool show last month we bought some Lincoln  wool (roving).  I wasn't absolutely sure what I'd do with it, but since then have worked up an idea to make some tweed material for a waistcoat.  The wool is naturally coloured a darkish brown with lots of grey streaked through it and it has very long fibers which will mean I can spin a quite thin 3ply yarn.

As the eventual cloth will be a broken twill I need a contrasting (or at least different) colour so I tried a 50/50 blend of Clun Forest and Lincoln.  It has come out quite well.  I did a quick 1 oz batt and stretched that into roving.

Original to the left, and blended roving wound on stick.
I had also run some CF locks through a food colouring dye process - there are samples in the photo above.  I have about 3 times this amount.  It will be introduced randomly during the spinning process to give little snips of colour through the yarn/cloth.

I still have about 4 skeins of Alpaca to make - so won't be spinning this until sometime next month.  As far as the cloth - that will be about two more (loom) projects away.  In the meantime I'll continue carding the wool in preparation.

Saturday, June 16, 2012

RSotBR progress

The weaving is now racing along - with over half of the first one finished.

1/2 way through #1
In the photo the structure is a little clearer now.  With nice soft chunky roving stripes between tabby shots - that just show the colour variations in the warp (visible above the fell line and roving shot).

In between weaving sessions Anne is now churning out new batts from the mountain of flicked wool she has accumulated.  It's fairly fast as the wool is so aligned that a couple of runs through the drum carder produces a nice 1.5oz batt ready to be stretched into roving.
Flicked locks

Batts ready to go.
While all this is going on I've been doing a final clean of the Leclerc Dorothy table loom (reed) to get it ready to weave a scarf for Isabel - I've ordered the yarn from Yarn Barn of Kansas.  I'll be using the same orlon I used for the baby blanket which will make a nice 'drapey' scarf - in three shades of lilac and a blue.  More to follow on that.


Sunday, June 10, 2012

Right Side of the Bed Rug

After completing the warp a week or so ag0 we managed to get going again on the RSofBR.  Our visitors J&J departed today for Philadelphia and as it was going to be 90+ degrees outside we decided we could stay inside and get the loom dressed and weaving.
Two hands make the threading easier...
Sleying the reed
 With the loom set up we prepared a little bit of roving, and with the weft yarn all ready used some heavy three ply to spread the warp then wove 1" of tabby which will become the sewn end, Next is 4 shots of roving (at half the ends per inch) then 4 shots of yarn then repeat. In each 4 shots of roving we are adding random bits of blue roving to add some colour.
3 repeats 
In the photo above is the inch of tabby at the bottom then roving (ending up as weft faced) separated by 4 shots of tabby.  The warp is in stripes which shows up in the tabby against the white weft.

I'm not the weaver for this one (it's Anne's project).

It's coming out pretty much as I imagined it would - now to see what a complete rug will look like :-)


Friday, June 1, 2012

Roving Rug III

Now very cleverly called the "Right Side of the Bed Rug" as the final use of this first attempt will be as beside rugs (probably a gift for the first set).  From basic ideas this has grown a little, and been shaped by the lucky acquisition of some blue carpet warp.

As this is Anne's first project it has been a case of walking through all the necessary calculations for warp length and width/ends per inch. Generally seems simple when you've done it a few times, but I suspect can be fairly daunting.  Of course then, I add a twist or two by suggesting this would look good with a merged stripe warp and plain white weft, but roving at half the ends per inch of the straight tabby.  So not 'quite' simple!!

Lots of calculations later we had all the measurements and started to wind the warp.

Tying off at every 12 ends!
 Everything would have been straight forward if it had have been three colours in stripes of an even number of ends.  Needless to say this wasn't quite the case.  The effect required, coupled with the width of the rug, and the wraps per inch/sett of the warp meant that the stripes (and their 'merging' areas) needed counting at a different rate to the sett for the eventual sleying of the reed.  AND I introduced winding the two colour merge areas together (a trial that seemed to work) so that really played havoc with the 'counting.'

The finished warp
 Anne prepared a very detailed chart (visible above) that said when to change to the 'merge' areas, change colour, and tie up each bundle of 12 warp yarns.  VERY easy to follow, and something I think will become a standard.

Close up of warp
As we have dinner guests tomorrow this may not get on the loom until next week, but it should look really good with plain white (Clun Forest, of course) wool weft - alternating stripes of roving then yarn.  I'm hoping we can beat it so that the warp does not show on the roving shots, but does (exposing the blue) on the tabby woven shots in between the roving.  Some experimenting to get all of that balanced will be required.

Dorothy

I have had the good fortune to acquire another table loom.

Table loom number 1, bought at a second hand store in Karori Wellington (in good working order), has been donated to a good friend as payment for storage in NZ of my large rug loom.

This loom is a Nilus Leclerc 'Dorothy' 4-shaft table loom.  A model that is still in production today (see: http://www.leclerclooms.com/ind_eng.htm for all sorts of information about the company), and is popular not only as a traveling/workshop loom (it folds with the warp in it), but is used in many weaving schools for basic instruction.

This one was not longer being used, and had one missing part (but quite a few extras).

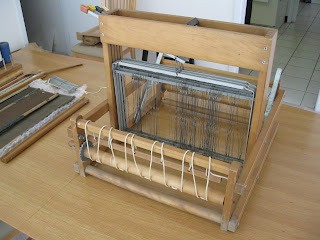
'D' with the old warp cut off, and reed removed.

The missing part was the top of the beater frame (which holds the reed in), the part is available, but I received an email saying it had been found, so it turns out to be intact at ready to go - after some cleaning.

To clean it up I: removed and soaked all the wire heddles in vinegar, removed rust spots from the heddle frames, lubricated the heddle bars, wiped down the woodwork, oiled all woodwork, cleaned the reed with a small wire brush, taped up the top and bottom of the beater and greased all moving parts.  All done in less than a day.

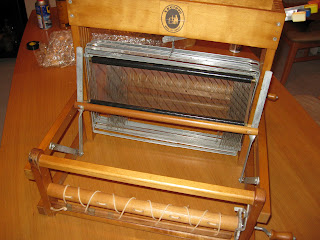
All clean and nearly ready to go.
I will still need to use some thick string on the reed to remove any cleaning residue, but that can wait for the missing part.  I then have an idea for a project to try it out.  Watch this space.

Alpaca progress

I've been spinning away with the NZ bought Alpaca (Chocolate and Cairo), and have settled into a fairly steady routine.  It's taking about five and half hours to spin, ply and wind each 2oz skein.  Mostly that is not in one session, but I did one complete run last Sunday (with just breaks in between sessions) - I think that would be the first time I have completed one skein within a day.  It certain is proof that I can't sit and spin continuously for more than about an hour and a half before the back starts complaining.  I'm normally ready for a cuppa or a glass of wine way before that time anyway :-)

The first 6 skeins
This is about the half way mark, as based on weight and what I started with there should be about 12 skeins in total for the project.  As it is the project after next on the loom, I still have plenty of spinning time.