Monday, September 26, 2016

Townsend Blue Ribbon Festival

For the second time I was invited to demonstrate weaving at the Blue Ribbon Festival in Townsend, TN and I have now been demonstrating in Townsend for over two years at this, and other festivals connected with the Townsend Artisan Guild (TAG).  My connection with the Guild is through the Scenic Valley Handspinners where several members of that are from Townsend.

The Festival is held at the Great Smokey Mountain Heritage Center and is part of a very large Heritage Festival held in Townsend at this time every year.  One downside to that was finding our normal campground fully booked. This year Anne and I travelled up on Friday and returned on Sunday.  Last year I drove up and back on the same day.  Not being able to book into the Lazy-Daze campground turned out to be a blessing as we discovered the KOA campground down the road is, while a little more expensive, much nicer in almost every aspect.

We picked up the TAG Harrisville Design loom - a four shaft transportable jack loom they had received through a donation - on Friday night which made setting up on Saturday a little more leisurely.  Friday night dinner - after setting up the tent and a swim in the campground pool - was at the Mexican restaurant we have been to before and always found to be good.

Setting up on Saturday took no time, after signing in as volunteers.  I was on the porch of the transport building - where I have been most other times. Along with the loom I had brought a folding table and a bag of other examples of weaving and spinning.  Most people who took the time to stop and talk also had a look through the items and liked the variety.
Loom set up in my normal spot. Twill striped demo continues.

There was a steady flow from opening at 10:00 through to 3:45 when we finally packed up.  Anne helped out setting up and with a few other things through the day and was also able to jump on the shuttle and head down to the main site down at the Visitor Center.  She also picked a few things here and there, both free and paid for.


Action shots of weaving on the porch!  Tractors and way in the distance - a cow form part of the backdrop.  The exhibit next to me (inside) was 'Pick Tennessee' - featuring only products produced in TN.

During the day, chatting with the TAG members, I decided to join this guild (finally - I first thought I might about a year ago, but didn't get around to it!).  It is a juried entry system - the artist must submit 3 recent works for each category which are put before a panel of 4 TAG jury members, with experience in the fields they are judging.  I'm submitting in Natural Fibers, and Painting and have been working out what items to submit for the jury process which is the second or third week of next month.  I think I have enough pieces finished to submit.

Friday, September 23, 2016

Color Stripes

The dye process for the weft stripes went pretty smoothly although winding up a 412 inch long multi-thread bunch took a while as the linen likes to twist!  Under tension on the frame it is fine, but once off for the first rinse it takes on a life of it's own.  For subsequent rinses I loosely wound it onto a plastic cone (with holes) and ran water through it.  Then stretched it out in a long line in the back yard.  I then wound the single thread onto the cone, untangling as I went.  Luckily it was easier as I went on.
Dyed yarn on cone - minus one bobbin full.
The color scheme is supposed to suggest the Grand Tetons - we have a picture of the young couple, recently engaged, in front of the range. It's a standard shot of the mountains, similar to the one below.

Typical shot of the Grand Tetons.
The stripe once woven has pretty well all aspects of the picture.
One stripe
There is a stripe at each end of the placemat, with the color scheme reversed (sky towards the center on each).  There is also a silver thread running through the center of the background pattern.  This matches the white gold/diamond engagement ring in our photo.
Silver stripe
I wove the first placemat yesterday and all went smoothly - so it is just a matter of buckling down and doing some serious weaving sessions.  It would be nice if the weather was cold and wet, but unfortunately we're still sitting in the low 90's with no real chance of rain - mostly as it has been all year.

Wednesday, September 21, 2016

Colors of the Grand Tetons Placemats

The wedding present for Anne's nephew is a set of placemats and a table runner in bleached Belgian Linen with stripes that reflect the colors of the Grand Tetons - a favourite of the soon to be married couple.

The woven structure is one I have done before for placemats and looks particularly good when wet finished and ironed. 

I decided to try a slightly different approach to the 'stripe'.  The last couple of placemats required painting the warp colors in small batches that slightly randomly formed patterns when woven. This time I wanted to control the color transitions more closely to set out the color scheme for each stripe.  To do that I caclulated the weft width (with draw in) and the depth of the stripe and divided that into the zones of color which were (based on a photograph) required.  Basically:
start with Prairie, then prairie and trees, mountain and trees, mountain, mountain and snow, mountain and snow and sky, sky then deep blue sky.

I've used Yarn Barn of Kansas dyes (tiny amounts) along with a thickener (sodium alginate) and soda ash to fix - all mixed up and painted on to the sections.
Painted weft yarn
The yarn is currently wrapped in cling wrap for 24 hours, then will be rinsed and washed and dried before it will be wound on to a couple of bobbins ready to weave.  Along with a couple of shots of silver thread (to signify the engagment rings) the stripes should look good although you never know until it is woven!!

Sectional Beaming

Both the Macomber (BigMac) and the 'restored' loom (PT) have sectional warp beams. BigMac is 2" and PT 1.5".  Up until now I have never used them for the purpose they were designed - rather I have warped them traditionally back to front or front to back, but just tied on to the beam and wound on as the entire width of warp ends.  This has led to some almighty tangling, despite warping under tension and a slow/careful pace.  I decided I needed a spool rack and with it try beaming through a tension box direct to the warp beam (in 2" sections as this is on BigMac).

The first consideration was: how many spools?  Turns out this placemat project with linen at 24 epi would mean I need 48 spools - seemed like a logical start as the only higher epi count would be for something like a kilt which has other considerations and is way in the future (time to build a side rack with another 12 spools or so by then).

I was able to buy all the wood/supplies I needed in Cleveland and the rack itself was a relatively easy frame with some center supports.  I was worried that the holes for the axles wouldn't line up - I measured more than three times.  No need to worry though - the brass rods slipped through from side to side.  I glued and nailed it together and will in slower time fill the gaps and stain/varnish the whole thing.  There are several future modifications to make, but at this stage it was ready for the spools.

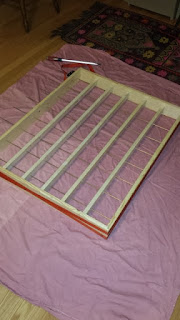
The frame prior to glue/nails (testing that the brass rods fitted)
I don't have a drill press (I must get one soon) so to drill out the spool centers from the wooden dowel I had to manufacture a jig for the electric drill to allow repeatable drilling through the center of each dowel.  Managed to get that all working and then made short work of drilling them out.  The next step was to glue and nail each cardboard end - another assembly line job quickly accomplished.  Once dry I was ready to wind some spools.
Drilling center holes

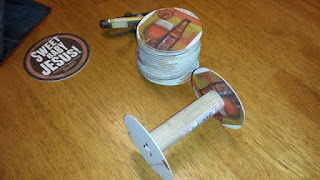
Spool ends (from beer coasters)
I made the center hole the same size as my shuttle bobbins so that I could use the hand winder.  I did have to take into account the spool was way wider than a typical bobbin so ended up mounting the whole set-up on the side of one of our kitchen stools - it included the bobbin winder and a yarn measuring device so that I could tell how much yarn went on to each bobbin - for this project 150 feet each.
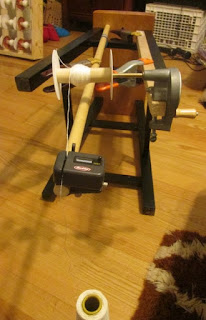
Spool winder
With the spools wound and fitted to the rack it was time to take the individual threads through the front and back combs of the tension box, a Nilus Leclerc No.409 I bought second had some years back, then after adjusting the tension and attaching the bundle to the warp beam it was a simple matter to wind 11 turns of the beam (it's approximately 3/4 of a yard), then move it all over to the next section.  The project is only 12 inches wide so only needed 6 sections wound.  Each section is finished by applying some masking tape and then cutting the ends.
Winding on
Each section taped and cut.
The next part of dressing the loom is to thread the heddles and sley the reed.  The tape from the winding out turned out to be a real blessing as it could be attached to a temporary beam immediately behind the castle  so that with a simple reach and peel off of the 'next' thread it could be passed through the appropriate heddle and then straight away sleyed through the reed which I had conveniently place right in front of the heddle frames.
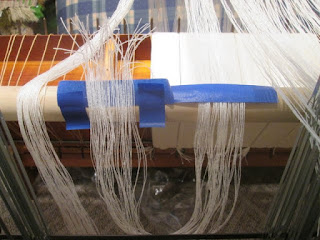
Warp ends ready to sley into heddles (taken from left)
This process took no more than a couple of hours to complete and I'm sure it was way longer when taking each warp end from a cross behind the castle.

With it all tied up it was a quick start to weave on the first couple of inches where I've stopped while the dye  for the weft stripes sets.

Return to Blog

It's been nearly a year since the last entry - not because I haven't been working fiber, but entirely as I have been neglecting to post info regularly - I did save it all with the intention of catching up, and there was the occasional fiber related Facebook post - but nothing like the detail needed.  So back to blogging with my current project which will be a wedding present for a family wedding we are going to in October.

I have done linen placemat sets for weddings before and they look appropriately up market, so it was an easy choice for this wedding.  The young couple are very big fans of the Grand Tetons so the plan is to have the colored stripe reflect the colors of the mountain range (future blog)

The last two times I have woven with linen I have experienced tangles (and that is understating the nature of the tangles) despite warping under tension and every other trick I could think of.  Anyway I decided early on I'd take a different approach (next blog entry).

The loom is dressed and I've woven the first couple of inches and have paused at the start of the colored stripe - as it still needs to set and be rinsed/washed I'll move on to the next blog.