Friday, September 29, 2017

Moonshadow

I dropped off the Neme skeins and picked up another fleece to process.  Pam had mentioned that the most popular skeins she takes to barter with are white colored because people like to dye them.  A quick check of her fleeces found a 2015 one from Moonshadow that is mostly white with a dark black as well.

2.2 lbs raw weight of Moonshadow fleece
The locks seem to be a good consistent length and apart from a little bit of dust accumulation at the cut end the fleece is in pretty good condition.  There are some minor second cuts, but I should be able to sort those out while sorting and washing.  Anne will be pleased as her favorite activity while watching TV is to remove guard hairs - this being llama it has plenty but they are really obvious and simple to remove in the early sorting/washing.

Llama guard hairs in the locks.

It took a little under 15 minutes to sort the colors into white, black and the rest, then I quickly removed the guard hairs from a sample of black.  In the photo below you can see the sorted color with the small back pile top left being the guard hair removed pile.

Sorted locks.
Next job is to start washing batches after blowing the dust out of them first which will leave clean locks ready for carding and spinning.  They get another wash to set the yarn on completion and that removes any final dirt/dust.

Sunday, September 24, 2017

2017 Guild Challenge

The Scenic Valley Handweavers Guild set a challenge at the beginning of the year to weave a 'bag' out of various yarns that were supplied to everyone joining the challenge.  There was a large amount of a gray polyester and varying amounts down to a few feet (of hand spun merino). In all about 10 different yarns.  The bag can be any kind and the idea is to incorporate some of every yarn into the design.

All but one of the challenge yarns.
Having lots of gray and a fair amount of a pink color and both being similar in size I used both in the warp - winding two irregular stripes of the pink (and using it all up) as I went.

Wound warp.
I'm making a bag for my tablet. It will have a folding flap and I'll have to sew in a lining and stiffener if it is to work at all.  Given the size of the tablet there will not be too much weaving - in fact it is pretty close to the loom waste, but as there was a ton of the gray that won't be a problem.  The weft will be all gray with inset 'boxes' of the various colors - some as they are, others twisted together or doubled to balance the size.  The boxes will form a diagonal line across the back and part of the front.  The flap will have a couple of shots of supplementary weft using the hand spun merino which is highly textured. 

Dressing the loom (Pete) has been pretty fast given the small amount of warp, but I do need to address a slipping friction brake before I start to weave.

Warp on the loom.
The project is due in 3 weeks. The weaving won't take long - hopefully that will be the case with the sewing and fastener!

Wednesday, September 20, 2017

Fall Color Cotton Dish Towels

With the Townsend Blue Ribbon Country Fair coming up at the end of the month I had picked up the Harrisville Design loom and brought it home ready to put some cotton towels on it to weave while demonstrating. This will be my third Country Fair and this time I will do the same as for the Fiber Arts Festival - put a long warp on the loom and weave before, during, and after the event - eventually ending up with a set of towels to put up for sale.

Given the time of year I decided to do a 'Fall Colors' towel and was able to pick up some reasonable dyed cotton at a good price from R&M Yarns in Georgetown.

Half the warp wound on.
10 towels is about as long as I would ever like to do on the warping board (which would probably hold enough for another 3 or 4 towels).  The HD loom doesn't have a sectional beam as do two of my looms.  Beaming directly from bobbins is the way to go for larger runs.

All the warp, chained and ready to dress the loom

Ready to wind on and potential for tangles all the way.
The long warp chains can be a problem, but I was able to keep it under tension as I wound on and only had one snag that led to a broken warp thread.  I caught it in time and was able to tie it up and resume winding. 


Threading the heddles and sleying the reed took a whole day as there are 480 ends.  I also had to supplement the heddles as the HD didn't have enough. Luckily I have the same size inserted eye heddles on one of my looms.  The reed is a 14 dent and it is sleyed at 2 per dent to make 28 epi - right at the top of the range for this 2 x 2 twill design.

First towel underway.
 The weaving is pretty fast as it is all going to be plain white weft - no changing colors for stripes.  The first couple of towels are in a M&W diamond twill design with a 24 thread repeat.  I've designed the next two with a slightly longer repeat that produces a more curved design.  I'll change after every two.

Close up of the diamond pattern
The weather at the moment is great so there won't be too much weaving going on while I'm outside working, but there's always early morning and evening to get some more done.

Tuesday, September 19, 2017

New Indigo Dyepot

On Saturday the Scenic Valley Handweavers gathered at the same Civic Center where we had held our Woven Shibori lesson the week before.  Everyone had prepared for the day by finishing the weaving, knotting the pull chords and soaking their scarves overnight in water.

We had our normal meeting first and then went on to the actual dyeing.

I had prepared by exhausting the old dyepot and while cleaning out the pot discovered a hole in the pot - only actually noticed when I scrubbed a blob of what I thought was indigo from the inside, but it turned out to be rust!!  Luckily we were passing through Cleveland (TN) and I was able to pick up a replacement 5 gallon pot.  The last one had lasted about 7 years, with most of that time full of indigo dye solution, so I can't complain.

I use the pre-reduced indigo powder for times like this as it is quick and uses relatively easy chemicals (Thiox and Soda Ash) to activate.

I showed the group how it was prepared/mixed and we retired back inside to wait the 15 minutes or so that it takes to develop.  Unfortunately it wasn't so - after 15 minutes it was still only just starting to turn a fairly light green and no copper bloom on the surface.  We waited another 15 minutes and saw a bloom starting to form but not really the rich dark green I have experienced in the past with the same volume and mix. Two things are likely to have contributed. 1. the indigo powder was a little old (although stored with the minimum of oxygen or moisture exposure) and 2. the source of water at the Civic Center is unknown so may have been high in something.

Anyway the mix did continue to darken so with a couple of dips for each scarf we were able to proceed.

5 minutes in the pot, 15 minutes to oxidize - repeat...

First dip and just out so still green.

Thursday, September 14, 2017

Indigo dyepot

To complete a woven shibori guild project all participants will be dyeing their warps at our meeting this coming Saturday.  I'm supplying the dyepot and said that I'd make up a fresh one - the guild is paying for materials.

As it turns out I still had the dyepot from our guild dye day last year and decided to try to bring it back to life to see if that could be done.  The dyepot has been sitting covered out in the back shed the whole time.

I followed recommendations in adding small amounts of a) the pre-reduced indigo, b) thiox, and c) soda ash.  In each case stirring gently and then leaving for 15 minutes. I then waited for a further 30 minutes to see what if any reaction there was.  For the first go around - none!!  I repeated the process and once again waited and noted that now the dyepot was returning to the expected green color so decided to try dyeing some pre-soaked cotton. 

Two dips of 5 minutes each with 15 minutes after each dip to oxidize and I had a pretty reasonable blue.  I then repeated the process with the woven shibori warp which had been soaking in water overnight.

After the last 15 minute oxidize I hosed off the warp then brought it inside and washed it first in Dharma professional textile detergent in tepid water, then two rinses, by which time there was little if any blue residue.

After unpicking the pull stitches from the woven shibori scarf I was able to lay the cloth out flat to dry.

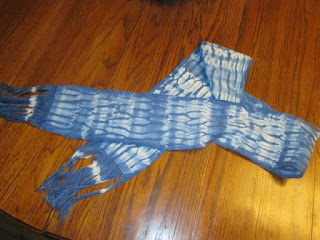
Woven shibori scarf after drying (camera flash lightens the blue)
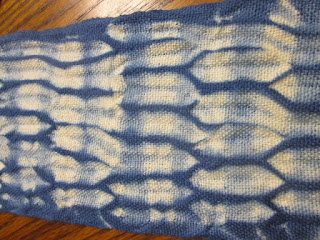
Reasonable dark blue (no flash)
Overnight the dyepot developed a pretty reasonable bloom.

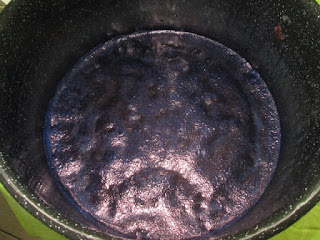
Bloom on the indigo dye
Given that this was a re-awakened dyepot and not a full strength version (good for 2 lbs of material) I decided 10 oz of Clun Forest handspun yarn with one dip should work OK and use up a lot of the indigo before I dispose of it ready for the new dyepot this weekend.

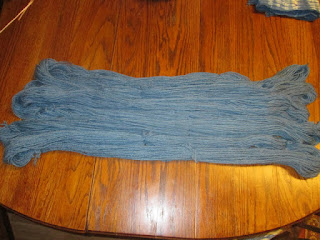
5 skeins of indigo dyed Clun Forest handspun yarn.
It will be interesting to see how the refreshing of this next dyepot goes as we will be dyeing between 1.5 and 2 lbs of cotton this time.  At least I know it is possible to wake it up again.

Woven Shibori

The Scenic Valley Handweavers had a special event this month with one of our members hosting a class on Woven Shibori - a technique I had read about, but never tackled.  The guild hired space in a nearby civic center (old Elementary School) for a whole day of instruction and weaving after first getting all the participants to dress their own loom.  There was 7 floor looms and 3 table looms in total with plenty of room to spare. All in a nice sunny room and we even had lunch supplied.

On completion of the day some of the floor loom weavers were finished their 60" scarf - I, using my table loom was just on 40" for the day, which I thought was fairly good.  It then took another couple of hours to finish off to the required length.

Tabby ground in 8/2 cotton and nylon pull threads in a monk's belt pattern
The weaving was pretty straight forward for the 4 shaft weavers. 10 picks of tabby and then 1 shot of the nylon pull thread. Repeat 3 times and then change to the alternate pull thread pattern (reverse of the first).

Once hem stitched and removed from the loom the work involved knotting all down one side first and then pulling the other side tight to form ripples in the tabby ground which would form the 'resist' when dyed.


Fat fingers and thin nylon is not a great combination, but eventually I had it all knotted and tied up tight.

The next step for the other participants will be to dye their tied up warps with an indigo dye pot that I will be bringing along to the meeting this Saturday.  I however, was able to dye my own warp by bringing back to life the dye pot from over a year ago (next blog).  The warp was soaked in water overnight while the dye pot awoke, and with two 5 minute dips and 15 minutes after each to oxidize the results were pretty good.

The dyed and rinsed scarf.

Close up of the shibori pattern
A very interesting technique, with this attempt being a very basic design.  Even that though, produces a quite spectacular final product.  The repeats of 3 are visible and many variations on this simple design are possible before getting into more complicated versions.  Then there could be over-dyeing to add other colors etc. etc.