Tuesday, February 19, 2019

Christmas Towels

Another rather long hiatus in blog entries, I'm afraid.  The good news however, is that there is great progress on the studio build.  The second slab was poured and finished last week so the building there can commence (as soon as the rain stops:  while we are not suffering nearly as much as those to the north of us, we are currently already up 7.5 inches of rain for the year and have 5 days of rain due this week!!).

Anyway, this Christmas, like previous, I made Christmas dish towels for all the family which now includes siblings and their kids, plus a growing list of friends who have ended up on 'the list.'  It meant this year I had to weave 27 for presents, so I increased the yardage a little and completed 35.  Needless to say I used the section beam to warp direct (as last year).  My original plan for the 2018 design was a Fibonacci sequence in green and red across the whole width and white weft with a plain twill weave structure.  As my sectional beam has 2 inch sections the original idea had to be re-thought to allow me to use the 48 spools in my rack to fill the 2 inch sections so the compromise was a smaller section of the Fibonacci sequence which lasted 48 threads. I filled every other section, reversed the rack (flipping the order) and then filled in the gaps.  Overall this gave a repeat pattern at 96 threads.

Winding the spools went smoothly and winding onto the back beam through the Leclerc Tension Box (with an added counter) was fast.  Dressing the rest of the loom took a couple of days but with a simple twill weave it wasn't too hard.


Using the large boat shuttle and not having to change for stripes (as I had done in the previous 4 years) meant fairly quick weaving.  I wove the first 7 towels then cut them off.  They were the ones I had to package and send to NZ.  They made it in plenty of time.  The rest were in one single length - zig zag stitched at either end and wet finished before ironing, cutting and machine hemming.

The towels were then packed up with about 6 being mailed to various family spread around the U.S and all the rest hand delivered as we had a family Christmas gathering this year in Knoxville so most could be given out personally.

I already have ideas for the 2019 Christmas towel and rather like the idea of not having to change weft colors (stripes) as much.  I have used huck lace in the past and just might use that again in the next design, although one never knows.  The good thing will be that the looms will all be set up in the new studio well before I have to start, so it won't involve moving a loom into our spare room to complete the project.


Friday, January 26, 2018

Texsolv heddles

As mentioned in a previous post, there was a pile of Texsolv heddles in the bottom of the bin containing all of the heddle bars and other wooden accessories.  I've applied some string ties to the 4 fitted heddle frames and will do so on the other heddle frames as I fit them.  That will avoid the problem happening again if the heddles are removed.

Yvonne had wound up a full bobbin of these heddles and as they are not continuous lengths of 100 heddles (as they are originally delivered), I can only guess these were used to supplement those shafts needing more than 100 for a particular project.

So the challenge was to build up bundles of (approximately) 100 heddles that could be tied off ready to put on the Glimåkra. Turns out this was fairly easy to set up given that I knew they are designed to slip on to the heddle bars.  So all I had to do was simulate those heddle bars at the correct distance and slip the continuous Texsolv over top then bottom bars (avoiding twists).

The heddle bar set-up
The lengths seem to be around 25 or so, but there are shorter.  As long as the appropriate links are in place they can be slotted on to the bars.

First 100 above originals
I've bundled up 100 and will continue with the rest of the bobbin.  I've let Yvonne know that the process works and will be able to show her how to set up some bars and reclaim the rest.

It certainly beats buying new bundles at $18 or so each.

Thursday, January 25, 2018

Glimåkra Day 2

Today I popped up to Maryville again to work on Yvonne's Glimåkra loom.  The previous visit was to put everything in place to connect treadles to lamms to heddle frames/bars.  It had gone smoothly but I wasn't so sure about today as this mechanism had a 100% more complicated shedding action (for every heddle that goes down, the rest go up, etc).  This action produces a wonderful shed but is quite different to the counter-balance and jack looms that I am used to.

The first step was to check that the heddles and reed (in the beater frame) were in the right place - easily confirmed by taking a thread from back to breast beam through a heddle eye at each end.  It turned out that the first day set up was pretty close.

Then came the connection of upper and lower lamms to the texsolve cords from both the lower heddle bars and the center of the horizontal jacks. Following a basic guide to countermarche tie up I was able to set the loom up relatively easily.  I moved the bench inside the back of the loom and could sit comfortably while I did this.

Once everything was connected I moved to the treadles.  For now, and with 4 shafts connected, I tied up for a straight tabby and twill which will allow Yvonne to get the hang of weaving and be a little creative as she gets more comfortable with the loom.

Tie-up required sitting (again) in the back of the loom, but given the dimensions it is pretty easy.  New to me was that every treadle had to have both up and down lamms connected.  With the aid of a quickly hand drawn diagram I completed it with only one error (found when I tested the treadles and one just refused to move - a wrong connection from treadle to the next lamm vice one directly above that hole). Beginner error for sure.

Simple tie up for the first attempt
 Once the tie up (and corrections) were out of the way I only had to adjust some of the earlier connections (texsolv again making that very easy). Then add in the apron bars back and front and adjust them. So for this visit the work was done.

A working loom
 Next and last visit will be to set up a warp and make sure everything is working smoothly before handing it over to Yvonne.  She has already purchased some wonderful colored and variegated yarns that will make perfect place mats and table runners. 

Tuesday, January 23, 2018

Glimåkra Assistance

I received an email from the Townsend Guild (sent to a few of us members) asking if anyone was able to help complete the re-construction of a loom at a Maryville Elementary School.  I was either the first or perhaps the only one to reply that I would be able to help.
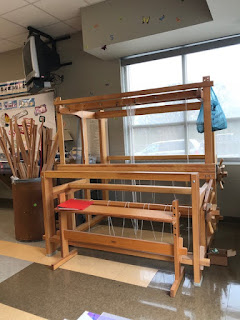
Turns out the loom is a large Glimåkra Standard loom that is a little over 20 years old and from initial pictures appeared to be all there.  It had spent some time gathering dust, and many pieces were stored, all mixed, up in a large bin.  There was a couple of bags of bits and pieces and a good range of shuttles and bobbins.

The lucky recipient of this loom is an Art Teacher (Yvonne) at the school. She is setting up the loom in a corner of her room so she can demonstrate how the weaving her students are undertaking in her class can be directly related to weaving on any kind of loom.


The installation instructions are in the red folder of the above photo and are fairly minimal after setting out the main components.  Yvonne's husband had done a good job getting it as far as can be seen in the photo and after seeing the instructions I can quite understand how the progress stalled.

My first job was to have a good look at all the pieces and see what was there/not.  It is an 8 harness model and everything checked out for that.  Unfortunately at least 4 (maybe more) heddle frames had been stored in the bin and had consequently slipped off into a pile of texsolv heddles on the bottom. Not a problem initially as there were 5 sets of tied off heddles in a bag so I'll be setting it up initially as a 4 shaft model.  After untangling more can be added.

After attaching the treadles and lamms I added the texsolve heddles to the heddle bars and hung the first four.  Having never used texsolv cord or heddles before it was a new but pleasant experience.  It is certainly better than having to knot nylon chord the number required on this loom and I haven't even made it to the tie up.
Day one finished
 After adjusting the height of the heddle bars the next task is to attach them to the upper and lower lamms.  I decided to call it a day at this stage as the rain was due and I still had an hour and a half driving to get home.  

I''ll be heading up in a couple of days to finish the 'construction' part of it and then tie up the treadles.  I'm working in completely new territory for that as my looms are either counterbalance or jack looms. I've never had anything that goes both up and down for each treadle.  The instructions are a limited but luckily there is a wealth of information on the web and I think I see a way ahead that will have the loom tied up for tabby or twill.  I'll then dress the loom so that Yvonne can begin weaving.

More to follow.


2017 Christmas Towels - Final Run

For the 4th year in a row we wove Christmas towels to give to the family, and like previous years I hit the deadline to deliver to everyone before Christmas but to do so had to cut off the first run and leave some warp on the loom to finish afterwards.

Final warp ready to be re-tied.
Woven on my 'Pete' loom - the 4 shaft jack loom made of black walnut.  The set-up went pretty well and I was well into my first towel when I noticed the friction brake cable was slipping down between the main brake 'drum' and the outside ridge (made to stop the cable coming off the sides).  In a commercially built loom it would have been made from solid turned piece of wood, but I had to compromise and glue nail my side pieces on.  With the prospect of having to free the cable after nearly every warp advance things were looking grim, and of course, I remember now I had thought about updating the brake after my last project on the loom.  Sigh: memory!!

Luckily I was able to work out a fix for this run of towels by placing some tiny nails into drilled holes around the circumference of the brake on the side where the cable was jamming.  This worked fine and this time I'll make a more permanent fix by replacing the whole wooden brake drum.

All the rest of the weaving went smoothly and the pattern being a simple herringbone I was able to weave fairly fast and eventually was weaving a towel in around an hour and a quarter.  With enough warp on the sectional warp beam for 30 towels there was a little bit of tension unevenness, but not enough to be concerned and it came out with the wet finishing.

Weaving on the loom - with the between towel marker threads visible

I had a total of 23 towels to weave to meet the family requirements and also two for sale to a woman at Anne's work who saw one that Anne had taken in to give to a friend.
Wet finished, ironed and cut up prior to hemming.
 I cut off the whole run and zig-zag stitched the ends and trimmed any cotton ends etc then wet finished by running it through a standard cycle on the washing machine.  After ironing I separated them at the between towel markers and pinned and machine sewed the hems.  The old sewing machine performed well although at times the foot switch behaved erratically by only allowing two speeds - completely off or on at full speed.  I think it happens after use for a while so maybe just needs a good clean-up/dust blow out.

Towels ready for wrapping and the post.
After finishing I wrapped them all and labeled and took a whole batch to the post office to get to both NZ and various US destinations in time.  We also managed to hand deliver a few while we were out and about.

I haven't decided on a design this year, but the 2017 towel was a change from small stripes and a huck lace feature to full colors (and small white stripes).  It is certainly easier than previous years where I have dyed the stripe colors here at home.  It depends entirely on being able to get reasonably priced 8/2 cotton yarn in suitable colors.

As I'm sure I have written in previous years ' I'll have to start earlier...'  We'll see...

Thursday, October 12, 2017

Fall Fiber Work


 With the temperatures in the valley starting to finally slip down into a more comfortable range and even some rain, I've been able to get cracking on several projects.  The highest priority was to finish the weaving on the Guild 2018 challenge bag.  That took about half a day to finish. It would have been much quicker but I had to work around a couple of minor warp problems. 


Finished the weaving, with a celebratory glass of wine!
 Once cut off the loom I ran some machine stitching across the ends and wet finished it in warm water with a little detergent.  Rinsed a couple of times and then dried flat and ironed on a hot setting under a damp cloth.


Finished and ironed.
 I went out yesterday and picked up some iron on backing and some cotton lining.  Along with some cardboard and magnets I now have everything to put it all together.

In the mean time I finished the first skein of llama wool and washed the second batch.

Drying llama locks inside under a fan.
 Once dry it takes another hour to run the lot through the drum carder (in two lots of approximately 1 oz each).  I then diz it off the drum and I end up with very easy to spin roving.

Llama roving ready to spin.

When not working on either of the above I did find time to finish another fall colors dishtowel and start another - I think 3 to go to finish the warp.  And of course there was the outside work - three wheel barrow loads of wood cut up and split and now stacked and drying, and I dug out the silt and fallen leaves from the dam so that we can pump some water up to the hot tub and get it running again.

Thursday, October 5, 2017

Return from Oneida, TN

We spent a very relaxing couple of days with friends in Oneida - well almost all relaxing. There was a few hours of digging out a RZR all terrain vehicle after we managed to get it stuck in a muddy creek!

I had taken my wheel and was able to fill two bobbins of a grey romney singles.  The wool had come from an inherited stash of odds and ends and it seemed like it would be easy to spin. It was!  I was able to ply it into a skein of about 2.7 oz., 140 yards 2-ply.  I'll look at a potential weaving project using this wool and some Clun Forest white 2-ply.

Skein of NZ Romney 2-ply
Once home we did some guard hair picking and lock sorting with the llama (Moonshadow).  That resulted in 2.5 oz of white which I washed and dried.  I then ran it through the carder twice and dizzed it off the drum to produce some nice looking roving that should be a dream to spin.

Llama (Moonshadow) roving.

I've also made progress on the guild challenge project - incorporating some of the supplied hand spun yarn as a supplementary weft and one other variegated yarn into a small square (using tapestry techniques).  I'll use up more of the yarn pieces in further squares.

Guild challenge project progress.
 And finally I've also been working on more Fall colored towels - these ones with a brown weft instead of the original white.  I think my towel count is 7 (of 10), but with the trip up to Townsend and weaving up there I've lost count a bit.  I did manage to finish one and a half towels up there while still talking to visitors most of the day.