Saturday, June 22, 2013

Cotton Towel Finished

Finished - with the traditional glass of wine :-)
I finished off the last 3 inches of the cotton towel (Guild project) this morning and as was the tradition in the US when a project is finished a glass of wine is earned. By the end of the 26" length I was actually moving along quite fast - I had finally memorised the sequence and could stand the odd interruption without loosing my place!

The weaving set-up
This photo shows how I ran my home made temple - wooden ends with nails, a chain to keep the width consistent and two of my large (telephone) glass insulators hung across chairs at the height of the warp to stretch the temple outwards.  It meant that from beginning to end the warp stayed at a consistent 13" width.

One selvedge.
The selvedges worked out pretty well - the use of a floating double thread and the temple and hand placing the weft thread all add up to a nice tidy finish.  Tension made a difference with the slub cotton warp - not enough and the unraised warp threads tended to 'stick' a little more which meant the floating selvedge threads often picked up an extra - I learnt early on to make sure they didn't and keep the wound on tension at a high enough amount to avoid it mostly.  The unwind speed of the warp beam and the wind on speed when the amount of warp on each is different along with the ratchet and pawl size on both means there is always a slight amound of difference I guess.

The finised piece.
Now that it is finished I'll contact the next person on the list and they can come and pick up the loom to do their section.  We should be through the list and ready to cut off the pieces and hem them in another month.  The warp lines (from three threads per dent in the reed) will disappear in the first wash.  Time now to go and pack it up. 

I will certainly be using this design again, but on the jack or counterbalance loom to make it a whole lot faster.


Friday, June 21, 2013

Guild Plying

While both Anne and I have been busy weaving over the last week - both the rug and the cotton towel projects are really going well - I have also managed to get a little bit more of the plying done.  The tally is now just under 2km of nice soft two ply in skeins.

All the skeins
Anne was able to produce - on her first go - a pretty nice small run of 2-ply which we've added to the pool.


Sunday, June 16, 2013

Guild project

I received a call from one of the guild members who had finished her part of the current weaving project (the one I wound the warp for) - she was number 3 on the list and I had said I'd be next.  She only took 6 days to finish her section (20 inches of woven cloth, plus 2 x 1.5 inch for the hems and 3 inches for 'practice').

The first three people on the list all tackled different designs (from the project sheet) so far be it from me to change that - and very conveniently the pattern I really liked hadn't yet been done, so it was not really a problem picking what I wanted to do.  I didn't even bother using my 3 inch practice warp to try anything different - I just got stuck straight in.  Actually I did use those inches to spread the warp out a little bit as it had pulled in quite a bit over the previous weaving.  To achieve that I made my own temple - based on the method I had used in the US (until I bought a couple of temples that is) of hooks either side of the warp, with weights hanging over the side of the loom, and something to ensure the hooks didn't 'stretch' the cloth too far.
Unpacking the guild loom
The loom is a 8 harness Mecchia table loom (made in Hamilton, NZ) that is owned by the guild and used for projects.  It packs up fairly conveniently - and it easy to set up.
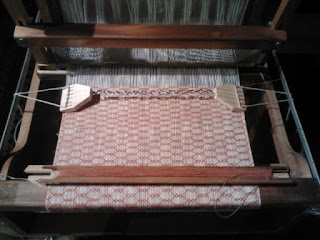
My part of the project
I was lucky enough to find some perfect weft cotton - exactly the same wraps per inch as the warp, but a fairly solid orange/brown colour.  It makes the pattern really stand out (both sides - one being the negative of the other).
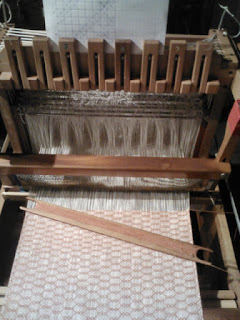
The first 12 inches.
I'm getting the hang of the loom now - and as you can see in the picture above, I have a fairly simple graphic to keep track of the 'treadling' - set up for each weft shot.  It would be so much faster with a) my foot treadled jack loom, and b) a boat shuttle (for speed), although the stick shuttle helps keep the odd wayward warp thread (slub cotton sticking together) in check.

I should be able to finish this in another few more nights work, and then work out how to get it to the next person.

The final work this weekend has been more plying of the guild woolen singles.  We have now done nearly 1.5 kilometers!!


Saturday, June 15, 2013

Rug finishing

The design for the rug completion is now done and we have started to weave again.  The first quick sketch shows the existing 'blocks' transformed into stripes that swirl into a central hole.

First sketch
After the first sketch I decided to add a center gold circle inside the black circle.  Then the next step was to map the whole thing out a little more accurately based on a full scale diagram.

The plan, on graph paper.
With the detailed graph we were then able to actually start the rows, and following the diagram it should then turn out reasonably close to what I want - there will not be nice sharp edges as the colours come together as I have had to vary the number of knots of each colour to accommodate both the swirl and the reduction in size.  Once at the half was stage I will have to abandon the tidy coloured strips in favour of a slowly randomising colour scheme as it wraps around the black circle.

The various colours cut up and grouped together.
The wool is cut by wrapping it around a couple of sticks with a groove between them.  Once thee is enough a knife is used to cut the individual lengths.  These are then grouped together into bundles with the number needed varying based on the thickness of the yarn.
Rug progress (front)

Rug progress (rear - with merging stripes more clearly shown)
Most of the weaving and knotting today was done by Anne - while I worked on the guild project.  The side white stripes here are our own Clun Forest wool - I have spun up some quick, thick, 2-ply.  The rest of the white (inside the grey stripes) is just plain commercial yarn.

Saturday, June 8, 2013

Plying

At the guild meeting on Saturday (the weaving meeting in the morning) we decided to look at a project to follow on from our current one (in fact begin before, so as to minimise the down time).  One of our weavers had collected a whole large bag of singles (white wool - I'm not sure of the origin) and had made some two ply of some of it, but the type of wool meant it was a little scratchy to the touch and destined for just making slippers (which a few are now starting).   There was also quite a lot of very fine (and soft) singles that it was decided would make great soft two-ply that we could then try dyeing and some individual project work while the cotton towels are still on the guild loom.  Given the plying is pretty fast I volunteered...

Woolen singles ready to ply
I did a quick check to see which way the singles had been spun.  It was 'z' spun (the wheel turning clockwise) - not really visible in the photo above, but obvious by spinning and unspinning on the wheel.  Next step was to roll some center pull balls from the much larger ball of wool.  Quick work with the ball winder.

Two center pull balls ready to ply.


First run of two play
2nd run of 2-ply
Bobbin full of two ply
1st skein - 270 meters, 50+grams
The process went fairly smoothly, although I did learn when I first started out that unless there was a reasonable twist in the ply the yarn rapidly untwisted.  I suspect a symptom of the singles being in the ball for some considerable time.  Normally I ply quickly after finishing the singles and the natural twist in the fiber works to tighly hold the ply together.  I did read somewhere about re-energising wool that has sat for a while, but would have to research that.  In the meantime the well twisted 2-ply still has a nice soft drape and should retain enough of the plying twist to keep it together.

It took about an hour and a half to ply the bobbin full, so this morning I managed to get two done, and thee will be quite a few more in the original large ball/cone.