Friday, July 26, 2013

Lots of weaving

Anne and I have been working on the guild project and the new rug over the last few nights. Plus a little bit of spinning (Clun Forest) to supplement the yarn needed for the guild ikat project.

Progress on the guild project is going well - Anne is racing ahead with the guild towel project and apart from a broken warp thread all is going well.

Guild project - half way through

I managed to get the upright loom dressed ready to make a kilim style rug and have managed to sort out a relatively good/consistent pattern which will have the basic white-ish background and a stripe with blue (changing from dark to light and then back) in the center.

The rug stripe
The plan will be to repeat the stripe (zig-zag) 4 times and then finish off with more grey (which also wraps up the side on this rug).

But in the meantime - it's off on holiday for a week, and begin work on these projects on return.


Monday, July 15, 2013

Guild weaving project

At the weekend meeting we found out that the weaver who took the loom after me, to weave her trial dish towel, was unable to because of other things taking up her time.  That meant that the loom came back with my towel as the last one.  We took the opportunity to bring the loom back home and give Anne a chance to try some advanced multi-shaft weaving.

We were able to find some quite nice purple colour - to contrast with the orange that I used.

Anne picked a design that is about 4 times as complicated as the one I did, and has raced ahead and finished about 4 inches in her first session (quickly identifying some of the many problems you can encounter when undertaking these sort of projects).

Notwithstanding - all problems overcome - and excellent results already.  It will be a spectacular towel when it is finished.

Anne's towel at the top.

With two projects on the go (the rug and now the towel) Anne will be busy - and time for me to do some spinning catch-up.

Sunday, July 14, 2013

Guild project 2

At the weaving part of the guild meeting this weekend we began a project to try out ikat weaving.  Anyone familiar with the term will know it is a method of preparing warp or weft with dyes that when woven will form some sort of pattern.  Very complicated versions are made in Indonesia/India/Middle Eastern countries (and no doubt more), but we are aiming a lot lower than that, and given the skill and knowledge of the leader for this project, probably very simple indeed.  Somehow I was volunteered for the job, I think because I had suggested it might be interesting to try, and I had just read the guild library book on the topic.

So with some work on the days leading up to the meeting to find some useful background information (photocopies made & attributed) and the construction of a 'shifting' device I began the task.  First job was to work out the 'maths'.  Everyone had a go at the Steve method - the way I work out the amount of yarn needed for the project, and a bit different for others to tackle.  To their credit everyone worked through the problem and we quickly identified that the amount of 2-ply I had made wouldn't be enough for a luxury scarf for everyone, so the plan b will be to adjust the size down to something that will use about 300 yards each, and call it an ikat sampler :-)

How long was that piece of string?
There were some great examples of ikat brought along, and also one member brought along her laptop with some great videos of ikat preparation.

Shifting device in the foreground, and working out amount of wool using a McMorran yarn balance
The calculations done, we divided up the yarn and all will go away and wind their warp yarn onto their warping frame.  Next month we will tie on some resist and dye the warp.  If time permits we will have a go at putting a stripe on some weft yarn to make our weft and warp ikat sampler.

Demonstration of what we might do with the weft yarn

One of the examples - useful for showing 'shifted' warp.
Everyone contributed useful tips and helpful thoughts - this project is likely to run for the next two meetings, so if the enthusiasm stays high, and I don't confuse matters too much,  I'm confident we'll get some great results.

Lichen Dyeing

At the guild meeting on Saturday afternoon we were lucky enough to participate in a 'group dye-in'.  One or two members of the guild had brought their 'stash' of lichen.  This had all been collected over many years and many years ago when it was permissable to collect the lichen that had fallen off trees - I believe Beech - at quite high altitudes.  I should have noted the name down, but think it might have been Pseudocyphellaria coronata (sticta coronata) as a quick google brought up a description of using it to dye with.

A simple process of adding water to a large pot - adding the bag of lichen (which is re-used for years) and bringing the water to a simmer and adding the clean wool.  10 minutes later taken out of the brown-ish water the wool is now a dark shade of purple!!  And after a quick rinse (no colour comes out though) the wool is ready to dry and use.

We were all allowed to dye up to 2 oz.  Anne and I tried a 2 oz batt of Clun Forest.  It turned out superbly. (The pictures, taken with my phone, do not do it justice)

Some lichen dyed Clun Forest batt, ready for spinning

After drying overnight, I divided the batt into three and quickly spun it into thin singles ready to ply.

Partially spun singles
The result was a just under 2 oz skein of 3 ply in a rich purple.  There are slight variations (nothing like in the pictures - that's the camera) which in the 3-ply form a nice subtle graduated mix across the whole skein.  I also had slightly different amounts on the three bobbins so kept going until all the purple was gone (I had started on top of some Clun Forest white singles) making some nice purple and white yarn.  Good for a feature somewhere.

The finished skein
After seeing how simple this is, we will be researching to find something similar in the US.  Noting an article on lichens in NZ it is good to see that very few of them grow exclusively here, so there is a good chance we will find something the same in TN somewhere!

Saturday, June 22, 2013

Cotton Towel Finished

Finished - with the traditional glass of wine :-)
I finished off the last 3 inches of the cotton towel (Guild project) this morning and as was the tradition in the US when a project is finished a glass of wine is earned. By the end of the 26" length I was actually moving along quite fast - I had finally memorised the sequence and could stand the odd interruption without loosing my place!

The weaving set-up
This photo shows how I ran my home made temple - wooden ends with nails, a chain to keep the width consistent and two of my large (telephone) glass insulators hung across chairs at the height of the warp to stretch the temple outwards.  It meant that from beginning to end the warp stayed at a consistent 13" width.

One selvedge.
The selvedges worked out pretty well - the use of a floating double thread and the temple and hand placing the weft thread all add up to a nice tidy finish.  Tension made a difference with the slub cotton warp - not enough and the unraised warp threads tended to 'stick' a little more which meant the floating selvedge threads often picked up an extra - I learnt early on to make sure they didn't and keep the wound on tension at a high enough amount to avoid it mostly.  The unwind speed of the warp beam and the wind on speed when the amount of warp on each is different along with the ratchet and pawl size on both means there is always a slight amound of difference I guess.

The finised piece.
Now that it is finished I'll contact the next person on the list and they can come and pick up the loom to do their section.  We should be through the list and ready to cut off the pieces and hem them in another month.  The warp lines (from three threads per dent in the reed) will disappear in the first wash.  Time now to go and pack it up. 

I will certainly be using this design again, but on the jack or counterbalance loom to make it a whole lot faster.


Friday, June 21, 2013

Guild Plying

While both Anne and I have been busy weaving over the last week - both the rug and the cotton towel projects are really going well - I have also managed to get a little bit more of the plying done.  The tally is now just under 2km of nice soft two ply in skeins.

All the skeins
Anne was able to produce - on her first go - a pretty nice small run of 2-ply which we've added to the pool.


Sunday, June 16, 2013

Guild project

I received a call from one of the guild members who had finished her part of the current weaving project (the one I wound the warp for) - she was number 3 on the list and I had said I'd be next.  She only took 6 days to finish her section (20 inches of woven cloth, plus 2 x 1.5 inch for the hems and 3 inches for 'practice').

The first three people on the list all tackled different designs (from the project sheet) so far be it from me to change that - and very conveniently the pattern I really liked hadn't yet been done, so it was not really a problem picking what I wanted to do.  I didn't even bother using my 3 inch practice warp to try anything different - I just got stuck straight in.  Actually I did use those inches to spread the warp out a little bit as it had pulled in quite a bit over the previous weaving.  To achieve that I made my own temple - based on the method I had used in the US (until I bought a couple of temples that is) of hooks either side of the warp, with weights hanging over the side of the loom, and something to ensure the hooks didn't 'stretch' the cloth too far.
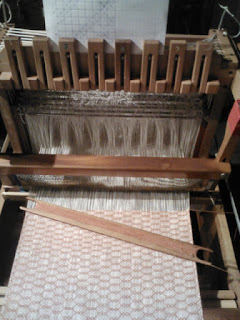
Unpacking the guild loom
The loom is a 8 harness Mecchia table loom (made in Hamilton, NZ) that is owned by the guild and used for projects.  It packs up fairly conveniently - and it easy to set up.
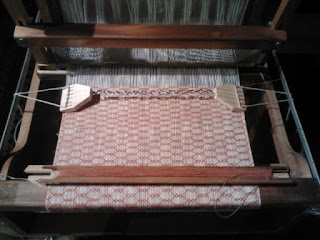
My part of the project
I was lucky enough to find some perfect weft cotton - exactly the same wraps per inch as the warp, but a fairly solid orange/brown colour.  It makes the pattern really stand out (both sides - one being the negative of the other).
The first 12 inches.
I'm getting the hang of the loom now - and as you can see in the picture above, I have a fairly simple graphic to keep track of the 'treadling' - set up for each weft shot.  It would be so much faster with a) my foot treadled jack loom, and b) a boat shuttle (for speed), although the stick shuttle helps keep the odd wayward warp thread (slub cotton sticking together) in check.

I should be able to finish this in another few more nights work, and then work out how to get it to the next person.

The final work this weekend has been more plying of the guild woolen singles.  We have now done nearly 1.5 kilometers!!